Could a clever layout and a few smart upgrades give you a custom feel without a custom price?
I guide homeowners to a dream that respects budgets, timelines, and real life. I used SEKTION in past remodels and paired it with semihandmade fronts to get warmth without the hefty price.
Small touches matter: soft-close drawers, an inner drawer, and a dual-bin trash drawer change daily life. I favor drawers over shelves and sometimes skip uppers in a galley to keep sightlines open.
We’ll also cover practical storage—slender pull-outs, a 12″ Tupperware bay, and appliance zones like microwave drawers and mini-fridges. I share real-home solutions and clear information pageproduct information so you can book an appointment with a kitchen expert and keep momentum.
Key Takeaways
- SEKTION plus upgraded doors can look custom without the custom price.
- Drawers and inner drawers boost function where you need it most.
- Smart pull-outs and dual-bin trash systems tame clutter.
- Selective uppers or open shelves preserve sightlines in busy layouts.
- I offer honest info, clear price guidance, and help to book an appointment.
Why Choose Ikea Kitchen Cabinets for a Dream Kitchen on a Budget
A smart system turns modest budgets into thoughtful design. I recommend this approach because it balances sturdy boxes and flexible sizing with hardware that performs day after day.
Value and function: you get reliable cabinets built to handle real life—cooking, snack raids, and baking marathons—without a premium price tag.
Modularity brings design freedom. Mix drawers, pull-outs, and shelves to suit meal prep, coffee routines, or kid-friendly snack zones. That flexibility keeps costs down and utility high.
“Smart planning turns a system into a custom-feel room at a fraction of the cost.”
Styles range from classic to modern, and simple upgrades—new fronts or hardware—make the finished space feel tailored, not templated.
- Wide variety of internal organizers and sizes.
- Easy replacement parts keep maintenance predictable.
- Practical choices let a dream kitchen fit real-world finances and lifestyle goals.
| Benefit | What it Means | Why it Matters |
|---|---|---|
| Modular sizing | Combine frames, drawers, and pull-outs | Custom layout without custom price |
| Durable boxes | Withstand daily use | Longer life, less replacement cost |
| Easy add-ons | Organizers and spare parts available | Keep the room useful for years |
Bottom line: a realistic plan, the right system, and clear pageproduct information pageproduct will get you a kitchen you love—without the dream budget.
Understanding the SEKTION System: The Backbone of Ikea Kitchen Cabinets
The SEKTION frame is the unsung backbone that makes measured remodels feel intentional and stable. I’ve used these frames with Semihandmade doors to get a custom look without a custom price.

Cabinet frames, rails, and modular sizing
SEKTION uses a rail and frame approach that eases installation on uneven walls. The rail lets you level tops quickly and avoids constant shimming.
Base widths—12″, 15″, 18″, 24″, 30″, 36″—create a modular grid. Mix and match and the plan fits your room, not the other way around.
Soft-close hardware and drawer-in-drawer functionality
I default to drawer stacks because they make everyday access ergonomic. Soft-close slides and hinges keep motion quiet and protect contents.
The inner drawer is a quiet hero. I stack flatware over dinnerware in an island drawer to gain function without changing the footprint.
“A predictable box with flexible fronts lets you refresh looks over time.”
| Feature | Why it matters | Typical spec |
|---|---|---|
| Rail system | Faster leveling on uneven walls | Adjustable top rail, steel |
| Drawer slides | Smooth, soft-close, rated for heavy pans | 35–100 lb load ratings |
| Modular widths | Fits tight layouts and odd gaps | 12″,15″,18″,24″,30″,36″ |
Price-wise, I use standard boxes and splurge on organizers that change how the kitchen feels. For clear next steps, consult the information pageproduct information and check pageproduct information pageproduct for specs and current pricing.
Planning Your Kitchen: From Inspiration to Reality with Expert Guidance
Good planning turns inspiration into a layout that works when real life walks through the door. I start by measuring precisely so your design software matches the room.

Measuring, layout, and traffic flow
I measure wall-to-wall, record centerlines for plumbing and gas, and note ceiling heights. This saves time and keeps installers from improvising on site.
We map walkways around the island, range, sink, and fridge to avoid bottlenecks. A few extra inches in a path changes how the whole space feels.
Booking a planning appointment and tools
I recommend booking an appointment with a kitchen expert early. I use planning tools to iterate layouts and hold slots during peak seasons.
Coordinating zones
We set zones: a calm galley with no uppers plus open shelves by the range, an island for flatware and plates, and a wet bar with selective uppers and a mini-fridge. Storage sits where you use it—flatware by the dishwasher, foils by the sink, spices by the range.
“Phase purchases: boxes first, organizers next, fronts and hardware last—so momentum, not chaos, drives the build.”
Quick checklist:
- Measure walls, centerlines, heights.
- Map traffic flow and clearances.
- Book an appointment with a planning expert.
- Set price and time checkpoints.
| Step | Why | When |
|---|---|---|
| Accurate measuring | Prevents on-site changes | Before planning session |
| Traffic mapping | Improves daily flow | During layout draft |
| Phased buying | Controls price and time | After final layout |
For specs and ordering, see the information pageproduct information and the pageproduct information pageproduct to lock details before your appointment.
Ikea Kitchen Cabinets
Knowing what you’re paying for—boxes, faces, and organizers—turns guesswork into a plan.
Box vs. front vs. accessory: the cabinet box is the structural piece. Fronts are the visible faces. Accessories—pull-outs, dividers, and drawer inserts—make daily life easier.
Common base widths range from 12″ to 36″. I usually favor a 3-drawer stack over a door-and-shelf base for pots, pans, and everyday plates. Drawers simplify access and cut bending.

Trim and fit: toe-kicks, panels, and fillers give a built-in look. I’ll add a subtle filler or custom panel where walls are off by a fraction—clean lines matter.
Front choices: in-house fronts work fast and predictably. Third-party doors or semihandmade options can add style or durability but may add lead time.
- Order samples and swatches to check finishes in your light.
- Build a clear listing in your cart: item codes, colors, and quantities—this cuts errors and eases returns.
- Installation runs rail first, then boxes, then leveling, then fronts and hardware.
“Phase purchases: boxes, organizers, then fronts—so the project keeps momentum.”
For full specs and to save your cart correctly, consult the information pageproduct information and pageproduct information pageproduct before checkout. It keeps your remodel smooth and predictable, and leaves room to upgrade later as needs change.
Doors and Drawers: Style, Function, and Everyday Use
What you open most days—drawers, not doors—should guide design decisions. I pair proven boxes with upgraded fronts so the room performs and feels calm.

Comparing fronts and third‑party options
I tested in‑house fronts against Semihandmade and other third‑party doors. Finish durability, edge detail, and lead time are the real differences.
White vallstena white reads clean; white vallstena white also reflects light differently than a white wood effect like enköping white wood or white enköping white.
Why drawer stacks win
Top drawers tame utensils. A shallow inner drawer tucks flatware above plates. Deep drawers hold pans without noise.
Hardware matters—soft‑close slides and thoughtful handle placement keep sightlines consistent and use easy.
“Choose function first; style follows when the daily routine feels effortless.”
Quick checklist: mock up layouts with tape, pick one focal style, and leave room in your budget for hardware upgrades. See the information pageproduct information and pageproduct information pageproduct for specs and price guidance.
Storage That Works: Inside Drawer Organizers, Trash Drawers, and Pantry Ideas
Good storage feels invisible until it saves your day—and then you notice how often it helps. I design around motion: reach, prep, and cleanup so the counters stay clear and the kitchen hums.

Drawer within a drawer
The island’s top drawer holds flatware with a slim inner tray above dinnerware. It keeps daily settings at arm’s reach and frees counters for prep.
Pull-outs for lids and wraps
A 12″ pull-out stores Tupperware, zip bags, and foils. Place it left of the sink for a natural cleanup flow and no more avalanche of lids.
Trash, spices, and serveware
I specify a dual-bin trash drawer sized for two large bins and a hidden bag shelf overhead—swap liners without opening another door. Flanking the range, a spice-and-oil strip keeps seasonings handy.
For heavy items, a 36″ cabinet becomes a serveware zone with dividers for platters, Dutch ovens, and bakeware so weight slides out smoothly.
We’ll carve a compact pantry with pull-outs for snacks and baking supplies. I include adjustable organizers for knives, lids, cutting boards, and a subtle labeling system that guests can actually read.
Practical note: compare parts on the information pageproduct information and save codes to your cart. See the information pageproduct information and the pageproduct information pageproduct for specs and a realistic price before you order.
Layout Choices: No Upper Cabinets, Open Shelves, or Classic Wall Cabinets
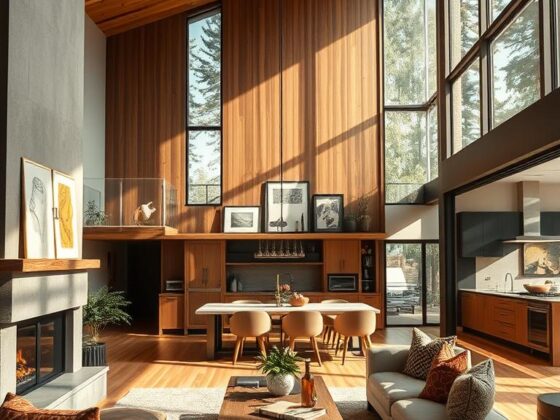
Sometimes the cleanest kitchen is the one that breathes—open above, organized below. I chose to skip uppers in the main galley and used two open shelves flanking the range. That move keeps sightlines open and lets light travel across the room.

Open shelves beside the range for everyday use
Open shelves make bowls, mugs, and everyday glasses easy to grab. I set shelf depth to 10–12 inches for plates and 8–10 inches for glasses to avoid overreach.
Bracket spacing: install supports every 24 inches and use solid cleats for heavy items. This prevents sag and keeps the run feeling intentional, not cluttered.
Selective uppers for a wet bar
For the wet bar I added a short run of wall cabinets to protect stemware and liquor. Doors keep dust and splashes out, so fragile items stay safe.
- Weigh visual calm against hidden storage and fill gaps with deeper drawers and pull-outs below.
- Coordinate shelf finish, wall color, and counters so the open run acts as a framed feature, not a mess of stuff.
- Style simply: decant, use trays, and keep rhythm—repeat the same plate or glass to reduce visual noise.
Hybrid layouts work well: a feature wall of shelves with a quiet stretch of classic wall cabinets where closed storage matters most.
“Open above, organized below—choose the balance that fits your routine.”
For part numbers and planning, save codes to your cart and check the information pageproduct information and the pageproduct information pageproduct before you buy.
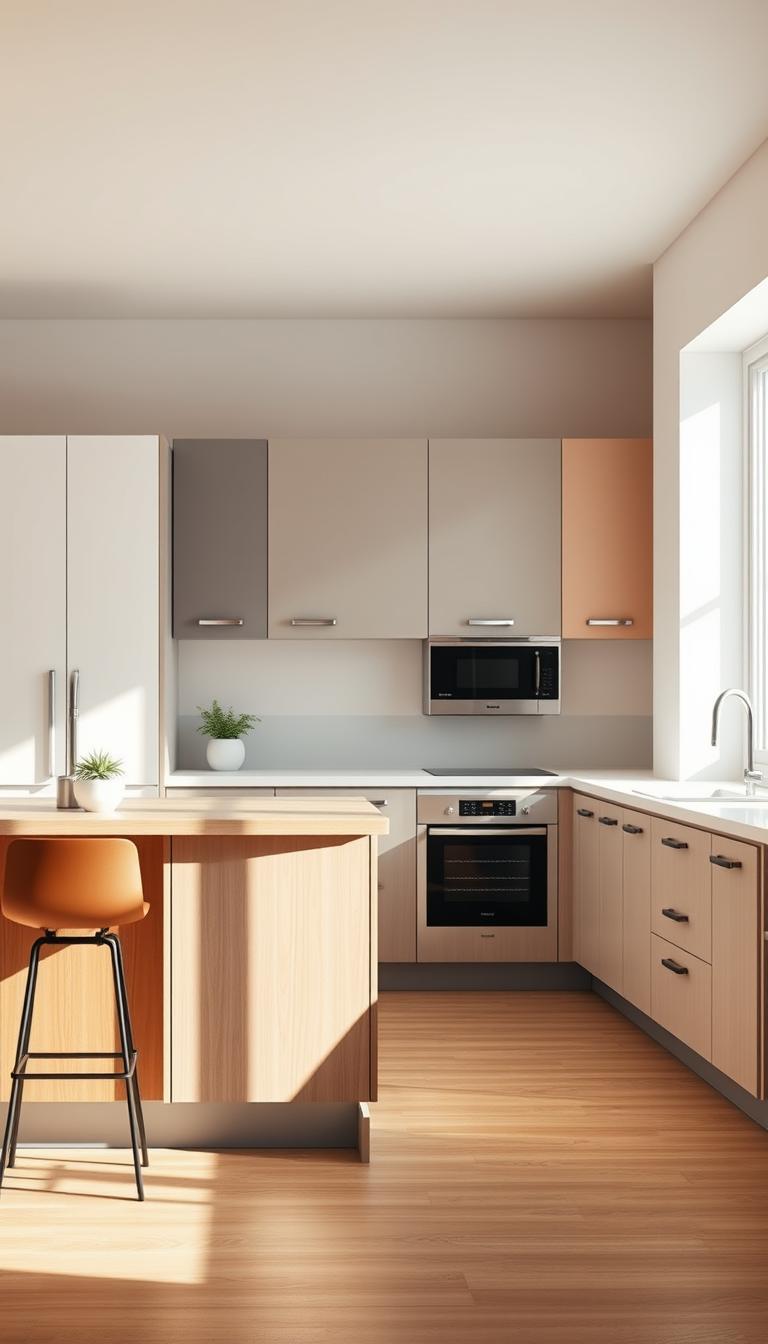
Finishes and Styles: From White Vallstena to Enköping White Wood Effect
A subtle white can read warm at dawn and cool by dusk—finish matters.
I compare white vallstena white with enköping white wood and a classic white wood effect so you can sense warmth and texture in real light. Hold samples vertically and view them from across the room—that test beats photos every time.
Modern slab fronts feel crisp on long runs and islands. Shaker or framed doors add quiet character on feature walls without creating visual noise. Use glass doors in wet bars and display nooks so light bounces and favorite pieces breathe.

Sheen matters. Soft‑matte whites hide fingerprints and age gracefully in busy households. If you have kids, prioritize low‑gloss or treated finishes to cut cleaning time.
Palette rule: use two core finishes and one accent. That keeps the room calm and coherent. Match shelf wood tones to counter veining and pick hardware metal that bridges the whites and wood tones.
| Finish | How it reads in light | Best use | Lead time note |
|---|---|---|---|
| White Vallstena White | Neutral, slightly cool in morning | Long runs, upper doors, modern slabs | Usually in stock; fast fronts |
| Enköping White Wood | Warmer grain, soft texture in evening | Islands, open shelving, warm accents | May add 1–3 week lead time |
| White Wood Effect | Textured, reads warmer across room | Feature walls, mixed-front schemes | Variable; check mixing rules before order |
Plan mixing carefully. Different fronts can change install timing and price. For part numbers and timing, save your selections and check the product planning guide and the information pageproduct information before you finalize choices.
Quality, Design, and Daily Durability
Quality shows up in the small moments: a smooth glide, a quiet close, a door that never sags. Those are the things you feel every day and thank yourself for later.
Good design is less decoration and more reach maps and clearances. I think about how a drawer clears a handle, how far a door swings near a wall, and where your hand naturally lands during prep.

Finishes matter. Pick hardware that protects high-touch zones and resist scuffs. Invest in heavy-use drawers and organizers; save on standard boxes where loads are light.
Warranty labels matter, but so does maintenance. I follow gentle cleaners, seasonal hinge tweaks, and simple checks so the product stays true to its price and promise.
“A small inspection today saves a fumble tomorrow.”
- Delivery day: check fit, finishes, and alignment.
- Open every drawer and door—note any rub or misalignment.
- Keep documentation for any limited warranty claims.
| Check | What to look for | Action |
|---|---|---|
| Drawer slide | Smooth, no catch | Mark and photograph for claim |
| Door alignment | Even gaps, level | Request adjustment before install |
| Finish | No chips or deep scratches | File a delivery note |
These small choices tie product, cabinet, and daily motion into a calm, confident room. Save codes and specs to the information pageproduct information and the pageproduct information pageproduct before you finalize.
Warranties That Matter: 25-Year Limited vs 10-Year Limited
Warranties are the quiet guardrails that keep a remodel from turning into a headache. I’ll make the differences plain so you can plan with confidence.

What the 25‑year limited usually covers
The 25-year limited warranty typically protects cabinet boxes, structural defects, and major hardware like hinges and drawer slides.
It often covers manufacturing faults and warping under normal use.
When a 10‑year limited applies
A 10-year limited plan usually covers finishes, painted fronts, and some moveable parts.
Normal wear, accidental damage, and improper installation are commonly excluded under both warranties.
How I keep documentation and claim info
I store digital receipts, photos, drawings, and serials in one folder.
Before install I photograph boxes, label fronts, and confirm measurements to protect coverage.
“Label panels as you unbox and save the packing photos—claims move faster with proof.”
- Before install checklist: confirm levelness, correct fasteners, and part counts.
- Claim tips: date-stamped photos, clear descriptions, and save replacement notes.
For specs and terms, check the information pageproduct information and the pageproduct information pageproduct so you know what your warranty actually promises for your kitchen and cabinets.
Price and Value: Building a Kitchen That Fits Your Budget
A clear price map keeps surprises off the schedule and out of your wallet.
I break cost into three parts: the cabinet box as the foundation, doors and drawers as the visible layer, and hardware as the finishing touch.
Appliances, lighting, and installation make up the next chunk. Plan a contingency (8–12%) for surprises: subfloor work, extra wiring, or unforeseen labor.
Where to splurge and where to save
- Spend: drawer organizers, soft‑close slides, and a reliable warranty — you feel these every day.
- Save: standard panels and trim that still look clean when paired with upgraded fronts.
- Timing tip: order boxes first, hold fronts and hardware until trades are scheduled.
“Build a short SKU listing so your cart matches the plan — fewer duplicates and faster installs.”
| Item | Typical price range | Priority |
|---|---|---|
| Cabinet box | $80–$250 each | High |
| Doors & drawers (good/better/best) | $50 / $120 / $350 | Medium |
| Appliances & lighting | $1,500–$6,000 | High |
| Installation & extras | $1,000–$4,500 | High |
I build a one‑page worksheet that lists SKUs, estimated price, and warranty notes so quotes are easy to compare on the information pageproduct information or the pageproduct information pageproduct.
Lighting and Accessories: Make Your Space Shine
A well-lit work surface saves time and spares accidents. I want your prep zone to be bright when you need it and cozy when you don’t. Good task light removes shadows and makes food and finishes look honest and inviting.
Under-cabinet options for task and mood
Under-cabinet lighting kills the shadow on your cutting board and adds a warm evening glow. Choose LED strips or puck lights and pick a color temperature that flatters produce and countertops.
Fit a dimmer so mornings are crisp and dinners are calm. That single control changes atmosphere without extra fuss.
Practical wiring, outlets, and tidy walls
I walk clients through wired vs. plug-in runs and how to hide cords for a clean wall line. Plan outlets where coffee makers and blenders live so counters stay clear.
- Accessories I recommend: knife blocks, tray dividers, spice inserts—small pieces that cut clutter.
- Match lighting choices to your overall price plan so each lumen earns its keep.
- Maintenance: wipe lenses, check adhesives, and tighten mounts seasonally.
“Plan the light when the boxes go in—install timing makes all the difference.”
| Option | Pros | When to choose |
|---|---|---|
| Hardwired LED | Clean look, reliable | Full remodel, long term |
| Plug-in strip | Lower up-front cost, flexible | Rentals or quick updates |
| Dimmable driver | Versatile mood control | Dining-adjacent counters |
- Decide color temp and dimming level.
- Place outlets and plan cord routes with the installer.
- Install under-cabinet light before final fronts so wiring hides behind cabinets.
For part codes and exact specs, save selections to your cart and check the information pageproduct information or the pageproduct information pageproduct before you buy.
Appliances and Integration: Ranges, Microwaves, and Mini-Fridges
Appliance choices shape how your space breathes and how you use it day to day.
I’ll help you decide between a microwave drawer bay or a built‑in cubby. A drawer keeps the range wall clear and keeps sightlines open. A cubby can be cozier but needs clear ventilation planning when the range sits on the back wall flanked by open shelves.
Microwave placement and small‑appliance storage
One reliable move: tuck the microwave into the island and add a shallow drawer below for a crockpot, mixer, and immersion blender. It frees the cooktop area and gives a purposeful spot for small items.
Wet bar and mini‑fridge integration
Place a mini‑fridge at the wet‑bar edge for easy access during gatherings. Leave room for plumbing, toe‑kick vents, and service access so nothing jams when friends arrive.
- Safety & power: outline circuits, GFCI placement, and hidden outlet locations in panels.
- Fit checklist: trim kits, toe‑kick vents, handle clearances, and cord paths.
- Sequence & planning: schedule appliances after bases are leveled but before final counters lock dimensions to avoid surprises.
| Item | Key fit point | When to order |
|---|---|---|
| Microwave drawer | Clearance below, venting path | After base layout, before fronts |
| Range | Hood capacity, wall vent path | Order with hood; check long leads |
| Mini‑fridge | Side service access, plumbing nearby | After island plan confirmed |
Check price impacts and long‑lead times as you save SKUs. Save part numbers to the information pageproduct information and the pageproduct information pageproduct so your installer and seller share the same facts. Small integration choices make a big difference to how the kitchen feels and works.
Small Spaces and Big Families: Storage Solutions for Every Home
When space is tight, thoughtful pulls and drawers multiply every inch. I prioritize narrow pull-outs by the sink and range so a few inches feel like acres.
For a big family, deep drawers hold lunchboxes and water bottles. A kid-height pantry keeps snacks visible and tidy so kids can help themselves.
I carve a cleaning zone under the sink with labeled bins and easy-access trash liners. An appliance drawer tucks crockpots and mixers away so counters stay free between meals.
Style matters, but durability wins. I pick simple fronts and forgiving finishes to hide scuffs and fingerprints in a busy home.
- Price priority: boxes and organizers first; fronts and hardware next.
- Overflow hack: back-of-island cabinets for seasonal platters and vases.
- Quick audit: right-size storage to your routine, not someone else’s Pinterest board.
“Design zones that match how your family moves—then the room starts to work for you.”
Save codes and parts to your cart and check the information pageproduct information and the pageproduct information pageproduct before you order so your kitchen plan and cabinets fit the real room and the real life you live.
Kitchen Services: Appointments, Design Help, and Installation Options
Book a short consult, bring photos and measurements, and we’ll turn choices into a clear listing. That appointment sets expectations and keeps planning focused.
I walk clients through whether to DIY or hire vetted installers—each path changes timeline and price. I explain the tradeoffs so you pick the right fit for your pace and budget.
Kitchen services and partnering with installers
Before we meet: gather measurements, inspiration images, and a rough list of must-haves.
- I map the handoff from design to ordering to install so roles stay clear.
- We build a precise listing of components, verify quantities, and plan fillers and panels to hide seams.
- I outline site readiness—subfloors, plumbing stubs, and electrical—so installers move fast and clean.
- We schedule inspections and walkthroughs at key moments to catch issues early.
“A shared document with product numbers and notes keeps trades, delivery, and your family calendar aligned.”
Tip: save your SKUs to the information pageproduct information and the pageproduct information pageproduct so ordering is simple and transparent.
Real-Home Walkthrough: How One Family Organized Their Ikea SEKTION Kitchen
Seeing a family use a plan in real life teaches more than any mood board ever could. In this home the layout proves small, smart choices make everyday tasks faster and calmer.
Island storage: cookware, dinnerware, and small appliances
I designed the island so the top drawer holds an inner tray for flatware above plates and bowls. The drawer under the island microwave houses a crockpot, hand mixer, and immersion blender—easy to pull and heavy-duty friendly.
Range wall: spices, cookware drawers, and large-serving storage
Spices live near the heat for quick reach. Deep drawers on the wall carry pans and lids so nothing rattles. A 36″ cabinet anchors serveware; dividers keep platters and Dutch ovens tidy and accessible.
Wet bar: stemware uppers, plumbing-conscious storage, and capsules
Uppers protect glass and stemware. Drawers hide full bottles and bar tools. A top drawer stores tea and espresso capsules. The mini-fridge sits at the far right while plumbing claims the sink base, so I planned drawers around service access.
- Just left of the sink: a 12″ pull-out for lids, zip bags, and foils.
- Trash drawer fits two large bins; liners tuck into a hidden upper for quick swaps.
What you’ll notice: movement is intuitive, everything has a home, and cleanup takes less thought. Save SKUs and check the information pageproduct information and the pageproduct information pageproduct before you buy to lock price and parts for your kitchen cabinets.
Common Mistakes to Avoid and Pro Tips from a Finished Remodel
Small missteps during install turn into daily annoyances later — I’ve seen it enough to know which ones to avoid.
Don’t undercount drawers. Skimping here steals minutes every day. Convert doors to drawer stacks where it matters and you’ll save motion and strain.
Lock power and ventilation early. Avoid floating appliances without a plan. During planning I mark circuits and vent paths so there are no last‑minute scrambles.
Leave breathing room at walls and corners. Tight clearances make doors and handles fight each other. A few inches changes how doors swing and how a cabinet feels to open.
- Order a few extra small parts and sample fronts as cheap insurance against dings or delays.
- Photograph every box on delivery — defects are easier to fix before install.
- Label shipments by zone (Island A, Range B, Bar C) so installers aren’t hunting parts mid‑day.
Most of all, build margin in your price and time. A buffer gives you the chance to make better choices rather than rushed fixes. Save your selections to the information pageproduct information and the information pageproduct information so specs match reality.
“Plan for small friction now and you buy time, not headaches, later.”
| Common Error | Why it Happens | Pro Fix |
|---|---|---|
| Too few drawers | Underestimating daily reach | Convert door bases to drawer stacks |
| Unplanned appliance hookups | Late electrical or vent decisions | Confirm power and airflow during planning |
| Crowded shelves and corners | No clearance mapping | Measure handle swing and add fillers |
| Missing small parts | Ordering exact counts only | Order extras and photo deliveries |
Want a quick read on common pitfalls? See this short guide to avoid common mistakes. Then save your SKUs to the pageproduct information pageproduct and the pageproduct information pageproduct so the install day flows and the final room feels like the plan.
Conclusion
A smart parts list and one focused appointment can convert a pile of boxes into a calm, functioning dream kitchen.
I’ve shown how measured choices—drawers where you need them, durable slides, and clear price planning—protect daily life and long‑term value. Book a brief appointment with an expert and bring measurements; that momentum matters.
Pick a timeless style—white vallstena white, white enköping white, enköping white wood, or a white wood effect—and invest where hands touch: hinges, slides, and organizers. Use warranty and replaceable fronts to guard your purchase and your budget.
Start here: save your SKUs to the information pageproduct information, and read a helpful complete review before your appointment. Your home deserves a kitchen that feels like an exhale—one smart choice at a time.