Homiscape.com
  • Homepage
  • Ideas by Room
    • Bathroom
    • Bedroom
    • Home Office
    • Kitchen
    • Living Room
    • Outdoor
Categories
  • Bedroom
  • General
0
0
Homiscape.com
Subscribe
Homiscape.com
  • Homepage
  • Ideas by Room
    • Bathroom
    • Bedroom
    • Home Office
    • Kitchen
    • Living Room
    • Outdoor
Ikea Double Desk
  • General

Ikea Double Desk: Perfect for Shared Home Workspaces

  • January 27, 2026
  • Jade Hunt

Total
0
Shares
0
0
0

Can one long surface change the way your family works at home? I ask this because I’ve seen tiny rooms turn into calm, organized hubs with the right setup.

I design shared offices and I often point clients to an IKEA-based double desk approach. It’s a modular product that pairs simple tops with supports like Alex drawers, trestles, or Sektion bases.

The result is a great desk that feels intentional. One continuous top, matching supports, and tidy storage cut the visual noise. That look helps people focus and still feel together.

I love recommending a solution that starts modest and grows. Add cable management, storage, or a floating mount later. You get a custom feel without the custom price, and the desk adapts as your family’s needs evolve.

Key Takeaways

  • A long, shared surface creates balance between togetherness and focus.
  • Mix-and-match IKEA parts offer modular flexibility and easy upgrades.
  • Choose matching supports for a calm, cohesive design and look.
  • Start simple: add storage and cable solutions over time.
  • A well-planned setup boosts daily use and family productivity.

Why a Double Desk Elevates Shared Home Offices

A shared long surface can turn a tight room into a calm, highly functional work area.

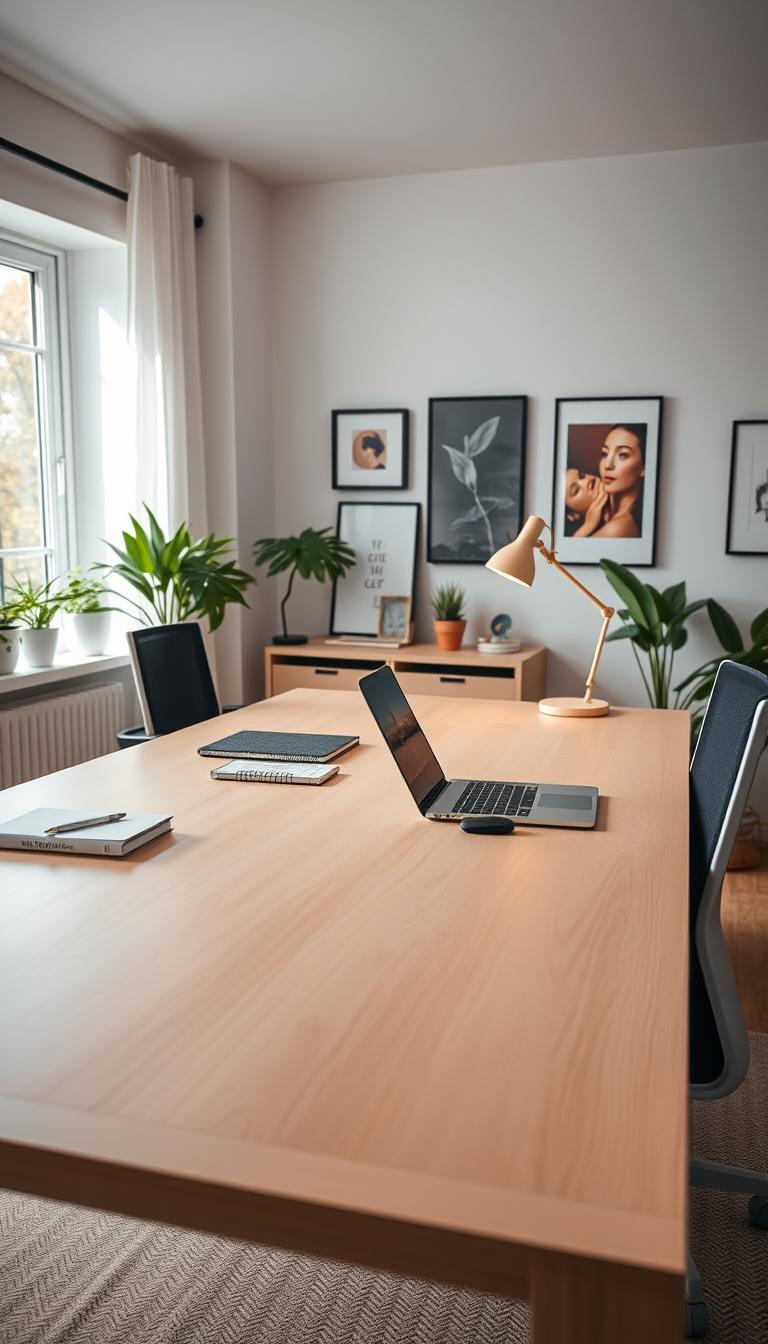
I’ve seen compact corners become purposeful places with one continuous top, Alex drawers used as dividers, or two tables back-to-back on trestles. Back-to-back setups create distinct zones—computer on one side, a clear creative surface on the other.

The benefits are practical and simple. When two people share a desk, coordination is easier. Papers stay put. Each work space feels defined yet connected for quick collaboration.

  • Family members find a natural rhythm and still keep personal focus for deep work.
  • One long piece clears traffic, cuts duplicate furniture, and opens flexible ways to reconfigure seating.
  • Behind a sofa or under a window, the continuous line visually stretches the space and keeps sightlines clean.

“A smart shared surface encourages daily rituals—open the laptop, share a note, get it done.”

Members get ergonomic balance with two chairs, two lights, and a tidy cable plan. A well-planned shared top makes small rooms feel larger and work feel smoother.

Ikea Double Desk Configurations That Work in Any Room

A well-planned long top can reshape how a room works, giving two people defined places to create and focus. Below are several setups I use again and again depending on room quirks and family habits.

A spacious interior home office featuring a modern Ikea double desk in the foreground, made of sleek, light-colored wood with ample workspace. Two ergonomic chairs positioned symmetrically at the desk, adorned with soft cushions for comfort. In the middle ground, an organized shelf filled with books and decorative items complements the desk setup, while a vibrant indoor plant adds a touch of greenery. The background shows a large window allowing warm, natural light to flood the room, creating an inviting atmosphere. The scene is captured with a wide-angle lens to emphasize the spaciousness and functionality of the workspace, conveying a professional yet cozy vibe perfect for collaboration. High-definition photorealistic quality brings out the textures and details beautifully.

Ready-made symmetry

Pair two matching units side by side for instant balance. Two identical desks give equal legroom and a built-in look once you align heights. Remove the legs on two Micke units and anchor the widened surface to the wall with L brackets for extra stability.

One-top DIY

My favorite DIY way is a single desktop resting on a center drawer unit. Alex drawers act as a spine—storage below, a clean line above. That drawer unit divides two seats while supporting the top.

Sleek long span and back-to-back

In tight rooms choose a Lagkapten 200×60 cm top for a seamless plane; support it with an Alex, a Malm dresser, or L brackets for a floating feel.

For multi-hobby homes, try two tables back-to-back—Linnmon tops on Mittback trestles. One side for sewing and craft, the other for a computer and monitor. No elbow clashes, more flow.

  • A drawer unit on casters adds flexible storage and clears the surface when needed.
  • Swap trestles or closed units to match the room’s vibe and function.

Key Ikea Components: Drawers, Table Tops, and Trestles

Smart choices in parts make the build effortless. The right mix of storage, supports, and surfaces gives a shared workspace balance.

A beautifully organized home workspace featuring Ikea desk components, prominently showcasing two sleek drawer units and spacious table tops arranged side by side. The foreground includes a clean, minimalist desk setup with stylish office supplies and a laptop, emphasizing functionality and aesthetics. The middle ground highlights the sturdy trestles that support the tabletops, crafted from light wood with a smooth finish. Soft natural lighting floods the scene, illuminating the warm tones of the wood and creating a cozy yet professional atmosphere. The background consists of a softly blurred home office setting with houseplants and neutral-colored walls, enhancing the inviting and productive feel of the shared workspace. The composition should exude a sense of harmony and efficiency, perfect for collaborative work.

Alex drawer units

Alex units pull double duty: they support a desktop and hide cables while holding supplies in smooth-glide drawers.

They come in two sizes and can divide two workstations cleanly.

Lagkapten tabletop

The Lagkapten top spans up to 200×60 cm for a single, seamless surface. I often wall-mount it with L brackets to avoid sag and to get a clean, photo-ready top.

Linnmon + Adils and Mittback trestles

Linnmon tops with Adils legs are my budget pick—light, simple, and easy to level on uneven floors.

Mittback trestles add height range for seated or standing work—great if schedules and postures shift during the day.

Base cabinets: Malm, Micke, Sektion

Malm and Micke give built-in storage. Sektion units bring kitchen-grade sturdiness and pair well with a Mollekulla countertop for a warmer feel—handy in rentals where drilling is a no-go.

“Choose supports based on use: drawers for daily files, trestles for openness, cabinets for bulk storage.”

  • Add a slim monitor arm or desktop riser to free surface area.
  • Always check that the top and units are level and secured for safe use.
Component Key benefit Best for
Alex drawer units Storage + support Daily files and tidy surfaces
Lagkapten tabletop Seamless span (200×60 cm) Unified look and photography
Linnmon + Adils Budget-friendly, light Starter builds and small rooms
Mittback trestles Height adjustable Sit-stand flexibility
Sektion / Mollekulla Sturdy, warm finish Premium feel without custom carpentry

Measure, Plan, and Fit: Getting the Right Size for Your Space

Start by measuring the room carefully. That tiny depth behind the baseboard decides whether the board will sit flush or need a notch. I measure height and length from wall to floor first.

A spacious, well-lit measure room designed for planning home workspaces. In the foreground, a large, sturdy measuring tape lies on a sleek wooden table, with a digital measuring device next to it. The middle ground features a large wall-mounted whiteboard, covered with sketches and dimensions of a double desk layout. A modern ergonomic chair is positioned in front of the table, suggesting a dual workspace. The background displays large windows, allowing natural light to illuminate the space, enhancing a productive and organized atmosphere. Soft shadows create depth, while a clean, minimalistic aesthetic reflects a contemporary design. The image should evoke a sense of planning and professionalism, ideal for a shared home workspace. Photorealistic and high definition.

If walls aren’t square, scribe and trim. Most walls lean a bit. Scribing the back edge to the wall angle keeps the look custom and keeps gaps small.

Notching a vertical panel for baseboards? Dry-fit that piece before you cut. For the first time, a single test saves a recut.

Small spaces and smart supports

In tight layouts I use an Alex unit as a center divider and load carrier. Another great way is to float part of the top with 1″ L brackets. That opens the floor and makes cleaning easy.

  • Map leg clearance, chair widths, and door swings with painter’s tape.
  • Plan outlets and cable chases so the desk top isn’t fighting power strips later.
  • Keep the palette calm in kids’ and guest rooms—lean pieces make the room feel larger and the look restful.

“Measure twice, dry-fit once—small tests save big headaches.”

Assembly and Stability: From Easy Assemble to Rock-Solid

Assembly is where the plan becomes a place. I slow down here and follow clear instructions so the result feels steady, safe, and finished.

A bright, modern home workspace featuring an Ikea double desk in the foreground, showcasing its sleek design and stable structure. The desk is adorned with neatly arranged office supplies, a laptop, and a small potted plant, all reflecting a productive atmosphere. In the middle ground, two individuals dressed in professional business attire are actively assembling the desk, demonstrating ease of assembly with clear tools and step-by-step instructions visible. The background highlights a well-lit, cozy room with large windows allowing natural light to flood in, creating an inviting yet focused environment. The overall mood is one of collaboration and productivity, captured in photorealistic detail with a slight overhead angle to emphasize the desk's features and assembly process.

Essentials and tools

Gather the basics before you start. I lay out the 3/4″ maple plywood, birch veneer edging, clear satin poly, wood glue, fine sandpaper, and all hardware.

Tools I use: circular saw, table saw with miter, chop saw, brad nailer, a drill, 1″ L brackets, and 1 1/4″ screws.

Step-by-step instructions

Start by putting together the drawer unit. That unit becomes your anchor and sets the desktop height.

  1. Cut the plywood to the correct depth, accounting for baseboards.
  2. Dry-fit and miter the edges so the waterfall lines up tight.
  3. Glue the veneer, then pull the miter together and secure from inside with screws.
  4. Attach the top to the cabinet with glue and screws; add L brackets into studs for long-term stability.

Extra support and finishing tips

L brackets are your best friend—two into studs across the back and a couple under the top stop rattle over time. If the span feels long, add discreet dowel legs for mid-run support.

Use edge tape or real veneer applied with an iron, sand lightly, then seal with a satin poly. Take your time—set a timer for each stage so cuts and fastening happen with care.

  • I like to sort all parts and hardware first so the easy assemble phase stays smooth and calm.
  • Follow the written instructions and always drive screws into solid material, not thin backers.
  • When everything is put together, test the desk for wobble, re-level feet, and confirm drawer faces align.

Design Ideas: From Scandi Minimal to Warm Wood Looks

When I build a long top, it’s always the small details that change the feel the most. Good design balances function and calm. Below are simple directions to make a shared workspace feel intentional and gentle.

A modern, minimalistic double desk setup in a shared home workspace, featuring sleek Scandinavian design elements alongside warm wooden accents. In the foreground, a stylish desk with natural wood grain, topped with minimalistic desk organizers and a laptop, exuding functionality. The middle ground showcases a comfortable chair in muted colors, positioned invitingly at the desk, while a soft, textured rug adds warmth underfoot. In the background, large windows allow bright, natural light to flood the space, illuminating the simple decor of potted plants and artwork on the walls, creating an airy and serene atmosphere. The scene has a photorealistic quality, captured with a shallow depth of field to emphasize the desk's design, aiming for a harmonious blend of functionality and comfort.

Scandi-inspired maple plywood with a waterfall edge

I often start with a single maple board and a mitered waterfall. That piece reads like one carved line across the room.

Tip: add skinny shiplap under the top for a neat reveal and paint the underside to match the wall. It quiets the plane and keeps sight lines soft.

Quiet palettes and edge-banded veneer

Edge-banded veneer keeps profiles minimal. Paired with half-painted walls in muted tones, the surface looks refined, not loud.

In kids rooms I echo the feature wall color under the desk so the workstation tucks into the architecture rather than shouting for attention.

Cable management and shelving for a calm surface

Shallow shelves above the top hide routers and route cables out of sight. A simple trestle setup keeps the floor easy to clean and the top clear.

  • A tone-on-tone scheme—pale wood with soft clay or blue—reduces visual noise.
  • Closed storage hides messy supplies; leave only daily essentials on the desk.

“Small lighting and a plant make the workspace feel lived-in and warm.”

Result: a restorative room where the board, finishes, and storage work together so the desk becomes a calm anchor, not clutter.

Budget to Premium: Ways to Maximize Value and Price Transparency

When budgets matter, you can still build a workspace that looks intentional and lasts. I guide clients to choices that protect the wallet without sacrificing longevity.

A photorealistic depiction of a stylish double desk setup in a cozy home workspace, emphasizing the concept of price transparency. In the foreground, display a well-organized desk featuring a minimalist desktop calculator, a sleek monitor, and an open notebook with visible budget notes. The middle ground includes two ergonomic office chairs positioned symmetrically, suggesting a shared workspace. In the background, softly lit shelves display a variety of decorative items and houseplants, adding warmth to the scene. Use natural sunlight streaming through a nearby window to create a bright, inviting atmosphere. The angle should be slightly elevated, capturing both the desk and the surrounding workspace in high definition, evoking a sense of value and functionality.

Budget builds: A Linnmon top with Adils legs or simple trestles makes a reliable, low-price table. It’s easy to level and expand. Calm monochrome setups keep the piece looking thoughtful, not cheap.

Mid-range options

Lagkapten paired with Alex drawers gives a seam-free surface and real storage. Mounting the top with L brackets keeps the look floating and neat. This product is the sweet spot for most homes.

Premium feel

For a richer finish, top Sektion bases with a Mollekulla countertop. It reads like furniture, not kit. Mary Lauren’s trestles-plus-top trick shows how to get spacious results without an enormous price tag.

  • Itemize every part in a clear listing so surprises stay small.
  • If you’re an ikea family member, factor member savings; members get seasonal promos that cut cost.
  • Balance spend: solid top, smooth drawers, and a good chair first.

“The best value is a setup that stays sturdy, looks timeless, and supports your routine.”

Conclusion

A well-built long top can quietly change how a family uses a room. I love solutions that flex with life: a single board or paired units that give family members get more focus, clarity, and togetherness in the same footprint.

Over time, storage matters. A center drawer unit and smart drawers keep clutter out of sight. For the first time DIY, follow your listing and cut plan, then let screws, brackets, and glue do the heavy lifting.

I’ve seen kids flourish—art on one side, homework on the other—while adults enjoy a great desk that still reads like furniture. Map your space, choose parts that fit your workflow, and build a desk top that felt like it was always meant to live there.

FAQ

What makes a shared home workspace with a double desk better than two separate desks?

I’ve helped families rework spare rooms and open-plan corners—pairing two work surfaces creates rhythm and shared utility. It keeps tools and chargers centralized, lets partners or kids spread out, and feels intentional rather than cluttered. You get symmetry, more usable tabletop, and flexible storage options like drawer units or a center divider for privacy.

Which desktop and drawer combos give the cleanest, most stable setup?

In my projects I lean toward a long laminate or plywood top supported by drawer units at each end. Alex-style drawers work great as both storage and leg support, while a thicker plywood top with edge banding gives a premium, tactile finish. Add L brackets or wall anchors for stability if you plan on heavy use or kids’ crafts.

How do I measure my room so the desk fits well against baseboards and outlets?

Measure wall length, room depth, and the location of sockets and radiators. I always check door swing and window sill height, then mock up the footprint with tape on the floor. For a snug fit, allow a 1–2 inch gap for baseboards or plan to trim the edge banding. If the wall isn’t straight, consider floating the desk slightly off the wall and anchoring it with brackets.

Can I create a long seamless desktop without buying a single expensive piece?

Absolutely. I often join two tabletops and hide the seam with a continuous veneer edge or a thin metal trim. Use dowels or biscuit joinery underneath and clamp while the adhesive cures. A Lagkapten long top avoids seams, but cheaper Linnmon tops can be joined for the same visual impact at a lower price.

What tools and parts do I need for a straightforward assembly?

Expect basic tools: a Phillips screwdriver, drill with driver bits, clamps, and a tape measure. Keep screws, L brackets, edge tape, dowels, and wood glue on hand. Follow the instructions for drawer units and then place the desktop; finally secure with brackets. I like to lay out all parts first so assembly flows smoothly.

How can I make the desk kid-friendly without losing style?

Use rounded edges, durable finishes, and cable management to reduce hazards and clutter. Height-adjustable trestles or monitor arms help ergonomics as kids grow. Choose wipeable surfaces and add a pull-out pencil tray or small drawer for art supplies—functional storage keeps the top clean and calm.

What’s the best way to add privacy or a divider between two workstations?

A narrow drawer unit or a slim bookshelf between stations works well as a divider and storage. I’ve also used a raised shelf or a fabric-covered panel clamped to the desktop for acoustic dampening. For a lighter touch, place plants or a low organizer to define individual zones without blocking light.

How do I balance budget and longevity when choosing materials?

Start with a simple, affordable tabletop and upgrade the edge treatment or legs for durability. Combine mid-range drawers for storage with a quality plywood or veneer top for tactile longevity. Little investments—edge banding, stronger brackets, better screws—pay off in fewer repairs over time.

Are there simple cable-management tricks that actually work?

Yes. I route power strips beneath the desk with Velcro straps, use cable trays or adhesive clips along the underside, and label cords. A grommet in the desktop near the center keeps chargers tidy. These small steps transform a messy surface into a calm workspace fast.

How do I secure a long tabletop if I’m worried about sagging?

Add support by spacing drawer units or trestles every 32–36 inches, or use a center leg or beam. For heavier loads, install a metal support rail underneath. Clamping and adhesive joinery between panels also stiffens a long span. I usually test with a box of books to spot any flex before final install.

What finishes and colors help maintain a peaceful shared office vibe?

I suggest quiet palettes—soft whites, warm maple, or muted greys—and an accent wall to ground the space. Half-painted walls and natural wood tones create a cozy, focused atmosphere. Texture matters: a matte finish hides smudges and feels more inviting than high gloss.

Can this kind of desk support sewing machines or heavier equipment?

Yes, with reinforcement. Use a thicker top, add extra trestles, and secure units to the wall. Place heavier tools over drawer units or supported spans to reduce vibration. If you sew frequently, I recommend a dedicated supported zone with a slightly lower or inset work surface.

How do I adapt a shared desk for both seated and standing use?

Combine fixed drawer supports with adjustable trestle legs or a sit-stand frame on one side. You can also use a motorized riser for monitors or a desktop converter for quick transitions. Plan cable slack and secure power strips so they move safely with the height changes.

Any packing or delivery tips when bringing multiple pieces home?

Measure your doorways and stair turns before purchase. Bring blankets, straps, and a cart if possible. Keep small hardware in labeled bags and take photos of parts before assembly. I always unpack on a clean floor and sort pieces by type—that saves time and frustration later.
Total
0
Shares
Share 0
Tweet 0
Pin it 0
Related Topics
  • Collaborative Workspace
  • Desk for Two
  • Home Office Design
  • Home Office Furniture
  • Ikea Double Desk
  • Ikea furniture
  • Ikea Workspace Collection
  • Shared Home Workspaces
  • Work from Home Setup
  • Workspace Solutions
Jade Hunt
Jade Hunt

Hi, I’m Jade Hunt — your friendly guide to creating a beautiful, comfortable, and functional home. At Homiscape.com, I share practical home organization tips, budget-friendly decor ideas, and minimalist lifestyle hacks to help you design a space you’ll truly love. With over 7 years of experience exploring home improvement trends and DIY projects, I believe every home has the potential to be warm, inviting, and uniquely yours. Whether you live in a small apartment or a spacious house, my goal is to inspire you to make the most of every corner. Let’s turn your living space into your dream home — one idea at a time!

Previous Article
Converted Church Home
  • General

Creating a Converted Church Home that Nurtures Wellbeing

  • January 27, 2026
  • Jade Hunt
View Post
Next Article
Maximalist Kitchen
  • General

My Journey to a Beautiful Maximalist Kitchen: Expert Insights

  • January 28, 2026
  • Jade Hunt
View Post
You May Also Like
Adult Bedrooms
View Post
  • General

Designing Adult Bedrooms for Better Sleep and Style

  • Jade Hunt
  • January 30, 2026
Rococo Decor
View Post
  • General

Bringing Rococo Decor into Your Home: Tips & Ideas

  • Jade Hunt
  • January 30, 2026
Spring Centerpiece
View Post
  • General

Spring Centerpiece Ideas to Brighten Up Your Home Decor

  • Jade Hunt
  • January 30, 2026
Modern Laundry Room
View Post
  • General

I Upgraded My Modern Laundry Room: Here’s How You Can Too

  • Jade Hunt
  • January 29, 2026
Modern Rustic Living Room
View Post
  • General

Modern Rustic Living Room Ideas for a Cozy Home

  • Jade Hunt
  • January 28, 2026
Maximalist Kitchen
View Post
  • General

My Journey to a Beautiful Maximalist Kitchen: Expert Insights

  • Jade Hunt
  • January 28, 2026
Converted Church Home
View Post
  • General

Creating a Converted Church Home that Nurtures Wellbeing

  • Jade Hunt
  • January 27, 2026
Hayden Christensen House
View Post
  • General

Inside Hayden Christensen House: A Design Inspiration

  • Jade Hunt
  • January 26, 2026
Homiscape.com Homiscape.com

Input your search keywords and press Enter.