Want to know how one single styled piece can change your whole room? I ask that question because I’ve seen a modest arrangement turn a cool dining area into a cozy, lived-in spot in minutes.
I start every client project with the same idea: one well-chosen focal object guides the rest of your decor. A simple centerpiece—minimal or luxe—sets mood, scale, and color without a full makeover.
You’ll learn practical steps. I’ll walk you through choosing a focal point, layering texture, and balancing height so conversation flows. Expect sensory tips—crisp branches, smooth ceramics, nubby baskets—that make your home feel grounded and calm.
I’ll also offer low-lift swaps for early season through Thanksgiving, safety notes for candles, and budget ideas I use with clients. Ready to style a centerpiece that looks beautiful and feels like you? Let’s begin.
Key Takeaways
- One focal piece can set the tone for your dining space.
- Simple swaps keep the look fresh from early season to holidays.
- Follow height and scale rules so people can talk across the table.
- Mix texture and scent to create a calm, sensory-rich mood.
- Safe candle practices and secure materials matter for real life.
Start Here: How to Use a Fall Table Centerpiece to Transform Your Dining Room
Begin with your dining surface — one intentional piece changes the mood of the whole room. I pick a practical anchor first because one well-styled centerpiece makes styling the rest of the house simple.
I usually start at the dining table and keep the width modest so daily meals still work. Low height keeps conversation easy. Let the piece sit in the visual center and guide pillows, throws, and a lantern or two.
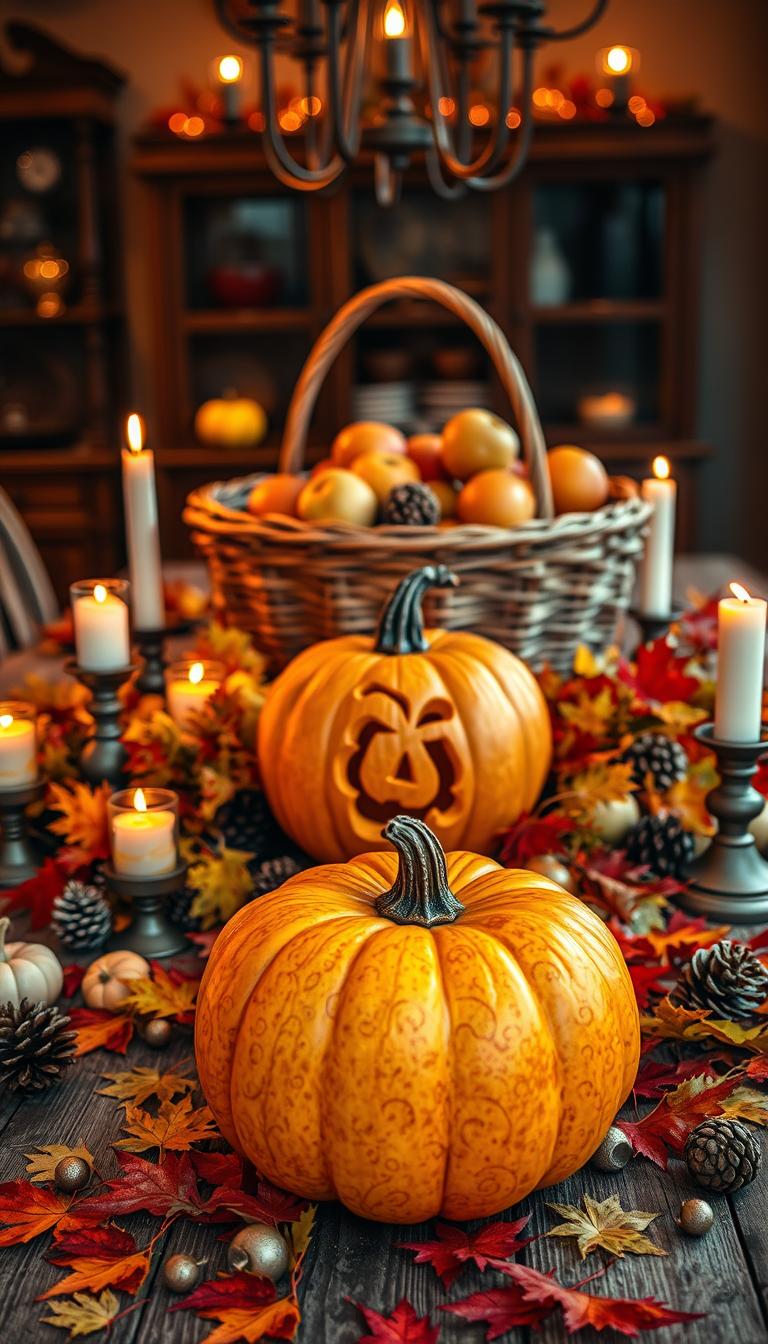
Choose a base you love — a bowl, tray, or shallow basket — then swap seasonal stems. A compact arrangement brings warmth and charm without clutter. Add taper or pillar candles to bring a soft evening glow.
If you’re short on time, a low bowl of fruit or a vase with branches and two candles transforms the room in minutes. Keep the color story tight; it makes deciding accessories faster and helps your fall decorating feel cohesive.
These simple ideas set you up for easy updates. Later sections show step-by-step methods to create polished, personal fall centerpieces you’ll use from early season to Thanksgiving.
Choose a Focal Point that Sets the Tone
A clear center anchor tells your room how to behave—calm, cozy, or formal. I always begin here because one strong focal point guides the rest of the styling.
On long surfaces, I use a series of smaller focal items: a trio of bud vases, staggered candle groupings, or repeat pumpkins on low pedestals. That keeps balance and keeps sightlines open.
On round or square surfaces, pick one striking piece—a sculptural vase of stems or a large pumpkin on a stand. A single object reads as intentional and grounds the whole layout.
Use finish and silhouette to match your room. A matte vase feels cozy. Glossy glass reads more formal. Layer small supports—mini gourds, berries, or votives—so the focal point breathes.
- I start with the focal point—it sets mood and scale.
- Long surfaces: repeat small pieces for rhythm.
- Round surfaces: one prominent item for clarity.

| Surface | Best focal approach | Visual effect |
|---|---|---|
| Long dining surface | Row of small vases or candle clusters | Balanced, conversational, rhythmic |
| Round or square | Single sculptural vase or pumpkin on pedestal | Intentional, elegant, focused |
| Buffet or console | Mixed heights: lamp, vase, grouped candles | Layered, collected, practical |
Build a Cohesive Color Palette and Texture Story
A thoughtful color story can make an everyday display read as curated and calm. Choose a color palette that complements your room and flows into nearby textiles and art.
Rich reds, oranges, and golds pair well with dried leaves, berries, and pinecones for a classic seasonal mood. If your home leans airy and minimal, lean into creams, ecru, and sage with a subtle metallic for glow.
I like to mix smooth ceramics with woven baskets and linen runners. That contrast of smooth and organic texture keeps an arrangement interesting without feeling busy.

Keep the palette tight for an elevated look
- Pick 2–3 dominant colors and one accent.
- Repeat small color notes across the room — a pillow, a vase, a napkin.
- Use darker hues at the base and lighter tones toward the top for a soft gradient.
Practical pairing tips
Balance warm and cool tones. A mossy green stem can cool a brass candleholder so the whole table feels grounded, not heavy.
| Style | Primary palette | Key textures |
|---|---|---|
| Classic cozy | Cinnamons, golds, burnt orange | Dried leaves, pinecones, warm metals |
| Minimal & airy | Whites, ecru, sage | Smooth ceramics, linen, light wood |
| Collected & layered | Moss green, deep rust, muted brass | Woven baskets, nubby textiles, natural stems |
Edit ruthlessly. If a color doesn’t serve the story, set it aside. A tighter scheme makes any centerpiece look more refined and intentional.
Must-Have Accessories for a Fall Centerpiece
A small cache of go-to pieces turns a good arrangement into a quick, polished display. I store a compact kit so I can swap looks in minutes.
Start with one anchor—a tray, dough bowl, or basket—and build up from there. That single base makes resetting for seasons effortless.
I favor versatile items: a large vase for branches, ginger jars for height, and a pedestal bowl for sculptural fruit or pumpkins. For soft glow, candlesticks and hurricane candleholders are essentials. They protect flames and add warmth.

- Kit basics: decorative tray, dough bowl, pedestal, and basket for texture.
- Light sources: hurricane candleholders, lanterns, and matching candle holders with candles.
- Glass cloche for a single pumpkin or candle—instant focal impact.
- Tiered stands, books, and risers to vary height without bulk.
“Pick one anchor and repeat materials—wood, glass, metal, ceramic—to make a collected, intentional look.”
| Accessory | Use | Material | Why I keep it |
|---|---|---|---|
| Decorative tray | Corral small items | Wood/metal | Creates a neat anchor and easy swaps |
| Dough bowl / pedestal | Base for sculptural displays | Wood/ceramic | Gives weight and texture |
| Hurricane candleholder | Protects flame | Glass/metal | Family-friendly warmth |
| Glass cloche | Highlight a single object | Glass | Refined, minimal focal point |
Natural and Faux Elements that Add Authentic Fall Charm
Natural accents—both real and well-made faux pieces—bring an instant lived-in warmth to any spread. I blend both so arrangements last longer and still read organic.

Leaves, berries, pinecones, dried stems, and branches
I use preserved eucalyptus and dried stems alongside faux berries for color that holds. Layering thin branches and curled leaves gives motion and depth.
Pinecones are my go-to filler. They add weight, hide mechanics, and feel woodsy without fuss.
Pumpkins, gourds, apples, pears, and dried florals
Small-scale accents—mini pumpkins, apples, or pears—fill gaps and bring charm. Dried hydrangeas, wheat, and lavender add soft texture against ceramics.
- I blend real and faux for longevity and texture—preserved eucalyptus with faux berries and a couple of real gourds.
- Tuck moss around bases to hide mechanics and create a grounded look.
- For busy home life, keep botanicals inside a tray so you can lift the display when guests arrive.
“Mixing organics and quality faux pieces keeps a display fresh, practical, and beautiful all season.”
Rotate bits weekly—swap berries for bittersweet or apples for pears—to keep your fall elements feeling new. These simple swaps make any centerpiece feel curated and easy to live with.
Size and Scale: Fit Your Centerpiece to Your Table
A well-proportioned display starts with the math — not the mood board. Use the one-third guideline so your display reads intentional and leaves room for plates and glasses.
Rectangular dining tables: the one-third guideline
Measure the length and aim for a centerpiece roughly one-third of it. For a 60″–72″ table, plan 20″–24″ long and 8″–12″ wide. For a 96″–108″ table, 32″–36″ by 12″–18″ gives a substantial, balanced look.
Round and square tables: recommended diameters
Keep the diameter near one-third of the surface. On a 40″–42″ table, 12″–16″ diameter works well. For 54″–60″ surfaces, 18″–24″ feels right and leaves elbow room.
Keeping width practical so place settings still fit
Anchor your focal point within these measurements, then add low-profile accents. Dense foliage reads larger than bare branches at the same footprint, so consider visual weight when choosing pieces.
- Tip: If you use a runner, keep the display inside its width for a clean silhouette.
- Tape out the footprint first — it’s the fastest way to preview scale before styling.

“Leave elbow room — guests appreciate clear sightlines and comfortable place settings.”
Keep It Conversation-Friendly: Height and Visibility
Aim for visibility: guests should see each other before they notice the decor. That one rule keeps meals warm and sociable, and it guides every decision about height and silhouette.
I keep the main focal point low and lush, then add thin verticals at the sides for balance. Pair a central vase with slim candlesticks or tall tapers flanking the arrangement. This creates symmetry without visual bulk.
My golden rule: if you can’t see the person across from you, your centerpiece is too tall for dining. Use airy branches if you want height—guests can look through them.
Place slim taper candles just outside the main spread so the glow is present but sightlines stay clear. For long dinners, consider LED tapers or tea lights—the modern options give a warm flicker and burn worry-free.
- Test from a seated position—sit down, look across, and tweak.
- Choose a narrow-neck vase so stems arch instead of forming a dense mass.
- Keep open flames at least 2 inches from foliage and never leave candles unattended.
“Comfort first; when guests feel at ease, your beautiful styling truly shines.”
Step-by-Step: Fall Dough Bowl Centerpiece
A simple dough bowl can become the season’s most inviting focal point with a few smart choices. I use this method when clients want an easy, lived-in look that stays low for conversation.
What you’ll need
- Dough bowl or shallow bowl
- Real or faux flowering cabbage / kale
- Small white mini pumpkins (2)
- Mini pinecones (several)
- Fall stems, greens, berries, floral wire
- Small candleholder and candle

How to layer and secure stems, berries, and candle
Place the bowl on your table and add the flowering kale first. That gives a lush base and visual weight.
Fill gaps with pinecones—they act as natural wedges and keep stems from sliding. Nestle the white pumpkin where it balances the form.
Tuck leaves and berries so they peek over the rim. Add a small candleholder off-center for a casual glow. Use floral wire or clear tape on any loose twigs so pieces stay put.
- Keep the height low and the footprint wide for easy conversation.
- If the bowl is long, repeat small clusters every 6–8 inches for rhythm.
- To shift into winter, swap pumpkins with extra pinecones and dried citrus.
“Start with texture—then edit. The bowl does the rest.”
Step-by-Step: Fall Branches Centerpiece
A tall, weathered vase can become the room’s quiet headline when framed correctly. I pick a large, chalky urn or matte vase first. It anchors tall branches and gives the whole arrangement a calm, grounded feel.
Choosing a statement vase and symmetrical candle flanks
Place the vase in position and add branches one at a time. Turn the vessel as you work so the silhouette stays balanced. Fluff the leaves gently and trim small bits to refine the arc.
Arranging colorful foliage for height without overwhelm
Aim for air and movement—keep branches spaced so the form feels elegant, not heavy. I like to flank the vase with slim tapers and matching candlesticks. One warm candle on each side creates symmetry and a cozy glow.

“Pick a sturdy vase, add branches slowly, and use narrow tapers to frame the composition.”
| Placement | Best use | Why it works |
|---|---|---|
| Dining | Move to buffet if small table | Keeps sightlines clear for meals |
| Buffet | Tall branches shine here | Shows height without blocking guests |
| Kitchen island | Statement anchor | Balances open-plan sightlines |
- Quick tips: choose honey or amber tapers to pull color from burnt orange leaves.
- Keep the base tidy—one narrow runner and a few acorns is enough.
- Mist real branches lightly on the day of a dinner and avoid heat sources.
Step-by-Step: Basket Vignette with the Rule of Three
A low-sided basket is the fastest way to create a relaxed, pulled-together vignette. It gives instant structure and texture without fuss.
Start by gathering three key items. One container with organic stems for gentle height. One pumpkin or gourd for seasonal presence. One candle for glow and warmth.
Place a small vase or jar of stems inside the basket so the height feels natural, not forced. Tuck in a few pinecones to add weight and rustic charm. Use a book or wood round under the pumpkin if it needs a lift—risers make the display read layered and intentional.
Keep the arrangement slightly asymmetrical. That relaxed look feels welcoming in a busy home and still reads polished.

Finishing touches and quick swaps
- Corral everything in the basket so you can lift and reset the table in seconds.
- Weave a ribbon around the pumpkin stem or add a sprig of berries for extra charm.
- Swap stems through the season—eucalyptus early, wheat and dried grasses later—to keep the look fresh.
- For safety and ease, choose a candle in a coordinated color: soft gold, honey, or cream work well.
“The rule of three keeps the eye engaged: height, mass, and glow—simple, balanced, beautiful.”
| Item | Role | Why it matters |
|---|---|---|
| Low-sided basket | Defines vignette | Contains items and adds texture |
| Vase with stems | Height and movement | Keeps sightlines clear and airy |
| Pumpkin / gourd | Seasonal anchor | Provides color and mass |
| Candle | Glow | Adds warmth and focus |
Step-by-Step: Grouped Fall Centerpiece with Tight Color Palette
A tight, edited palette makes a grouped display read intentional, even when pieces feel casually placed. I use faux stems, dried florals, and a few well-made berries to build a central arrangement that looks effortless but is actually planned.
Start by picking two dominant hues and one metallic accent. Limit the color palette so every stem, gourd, and prop belongs to the same story. That restraint makes the cluster feel upscale.
Faux stems, berries, dried florals, and scattered mini pieces
Build a low, central arrangement with faux stems and dried florals for longevity. Tuck in a focused sprig of berries for a tiny hit of contrast.
Scatter baby boos and a couple of dried gourds to one side so the composition “spills” and reads collected, not staged.

Using books and votive candles to balance the tossed look
Elevate a small cluster on a stack of books—burlap covers add texture without weight. Place one or two votive candles nearby; their low glow ties the grouping together at night.
- Keep the footprint compact so the table stays practical for meals.
- If it feels busy, remove one color or a small object and the composition breathes.
- For lasting style, rely on faux stems for the core and refresh a real stem weekly.
“This tossed-but-tailored approach is quick to assemble and always reads polished.”
Step-by-Step: Simple Apple Bowl Centerpiece
Quick, elegant, and reliable—this is the five-minute display I turn to on weeknights.
Start with a large shallow pedestal bowl and fill it generously with apples or pears—real or high-quality faux. The fruit gives instant color and a lived-in vibe that reads polished without fuss.
Position a small cluster of greens or berries on one side so they spill slightly over the rim. That gentle trailing motion makes the arrangement feel organic and relaxed.
Pedestal bowl with fruit, greens, and showy candleholders
Pair the bowl with two chunky, low hurricane candleholders. They’re showy but low enough to keep sightlines clear for dining. Use substantial, weighty holders so the look reads intentional.
Low, elegant, and perfect for everyday dining
This approach is about restraint. Keep the profile low, add a linen runner under the bowl to frame the silhouette, and choose fruit that echoes your palette—deep red apples for warmth or pale pears for a softer feel.
- Place a pedestal bowl at the center and fill it generously with fruit for effortless beauty.
- Add greenery or berries to one side so it casually trails over the rim.
- Pair with two chunky but low candleholders—balanced and dinner-friendly.
- Swap fruit weekly or use quality faux to keep the display fresh.
“This is my weeknight favorite: five minutes to assemble, and it looks refined every time.”
| Element | Role | Why it works |
|---|---|---|
| Pedestal bowl | Base and height control | Creates a polished, low profile that anchors the arrangement |
| Apples / pears | Color and texture | Instant seasonal charm and replaceable freshness |
| Greens / berries | Movement and contrast | Soft spill adds organic flow without bulk |
| Chunky hurricane candleholders | Glow and balance | Provide showy presence while keeping sightlines clear |
Layering, Balance, and Visual Flow
Small shifts in placement give a display real depth and personality. I want you to avoid the single-file look that reads like a string of identical objects marching down a runner.
Stagger placement around your focal object. Push pieces slightly forward and back so the eye travels through the arrangement instead of stopping at one flat line.
Staggered placement, varied heights, and depth
Vary heights with tapers, pillars, and risers—books, small plates, or a wooden round work well. Mix tall, thin elements with low, dense masses for contrast.
Pro tip: elevate shorter items on a small plate or a stack of books to avoid visual gaps. Use odd-number groupings—three or five—so clusters feel natural.
Corral small items on a tray for impact
Group small accents in a tray so they read as one confident element rather than scattered clutter. A tray creates unity and makes the whole setup easy to lift when you need space.
- Layer around the focal point—don’t march items in a line down the runner.
- Stagger items forward and back for depth; it’s the secret to a designer look.
- Balance busy textures (twigs, dried florals) with smooth surfaces (ceramic, glass).
- Repeat a texture two or three times to create rhythm without duplication.
- Edit one item out at the end—breathing room makes everything read cleaner.
“The goal is a layered arrangement that looks collected, not chaotic.”
| Techique | How to apply | Why it works | Quick example |
|---|---|---|---|
| Staggered placement | Place items at varying depths | Creates visual movement | Vase slightly back, candles forward |
| Height variation | Use tapers, pillars, books, plates | Prevents flat silhouettes | Taper + pillar + riser trio |
| Grouped tray | Collect small items on a tray | Reads as one strong element | Tray with mini gourds and votives |
| Texture balance | Mix smooth and rough surfaces | Keeps the composition calm | Ceramic bowl + twigs + linen napkin |
Want a quick checklist? Step back often. Your eye should glide from the focal piece to supporting items without snagging. For more detailed floristry design tips, see my design tips.
Symmetry vs. Asymmetry: When to Use Each
Choosing balance is less about rules and more about the feeling when you step back and look. Symmetry gives immediate calm—a central vase flanked by matching tapers reads classic and ordered.
I use symmetry for formal dinners and classic interiors. It simplifies the visual field when the dining table is busy with place settings.
Asymmetry feels relaxed and modern. Offset the focal point and balance with varied heights and textures to keep energy moving.
My go-to blend: repeat a color or metal at opposite ends, then vary shapes and spacing. That keeps rhythm without feeling rigid.
“Pumpkins or gourds can mirror color while stems and branches do the sculptural work.”
- Use symmetry on long tables when you want order; use asymmetry on round tables to keep the eye moving.
- Vary density—heavier grouping on one side, lighter on the other—to create intentional tension.
- For holiday meals, symmetry reads dressy; for everyday, gentle asymmetry feels effortless.
| Approach | Best use | Why it works |
|---|---|---|
| Symmetry | Formal dinners, classic rooms | Creates calm, simplifies busy place settings |
| Asymmetry | Casual meals, modern decor | Adds motion and personality with varied elements |
| Blended | Everyday & festive mixes | Repeats color for unity; varies shape for interest |
Candles, Votives, and Ambient Glow
A warm glow can make a simple arrangement feel intentional and lived-in. I pair a central arrangement with thin candlesticks and tall tapers for symmetry when I want a composed, dinner-ready look.
Low hurricanes and small votives are my go-to for dining. They protect flames from drafts and keep sightlines clear so conversation stays easy.
Mixing types—tapers, pillars, and hurricanes—lets you layer light without adding clutter. Scatter a few votives to connect separate elements into one cohesive decor story.
Tapers, pillars, and hurricanes for warm light
Use slender tapers to provide vertical rhythm without blocking views. Add one or two low pillars for presence, and place hurricanes around open flames when foliage sits nearby.
Safety tips and ideal candle heights on the dining table
Keep dining candles low or slender so guests can see each other easily. Place flames at least 2 inches from greenery and never leave candles unattended.
“I always snuff candles instead of blowing them—less wax spray and less smoke.”
- Mix tapers, pillars, and hurricanes to layer warm light without visual clutter.
- Keep candles low or slim so sightlines stay open for conversation.
- Use hurricanes to shield flames from drafts and protect foliage.
- Votives add soft pools of light—scatter a few to unify the spread.
- Trim wicks to reduce smoke and space flames at least 2 inches from greenery.
- Consider LED tapers for long dinners or family homes—they look realistic and are safer.
- Place candles just outside a very full centerpiece and snuff, don’t blow, when you finish.
| Type | Best use | Why it works |
|---|---|---|
| Taper | Flanking a central arrangement | Offers height and symmetry without blocking sightlines |
| Pillar | Low mass on either side of a bowl or tray | Provides steady glow and visual weight |
| Hurricane | Protecting flame near foliage | Shields from drafts and reduces fire risk |
| Votive | Scattered accents | Creates soft pools of light that link elements |
From Early Fall to Thanksgiving: Seasonal Swaps and Updates
A tiny detail can shift a casual spread into something that feels intentionally curated. Start with light greens and softer tones in early season, then deepen your color palette as the leaves change and evenings cool.
Small edits are low-effort and high impact. Tie a slim ribbon around a white pumpkin stem to pull colors together. Spray-paint or decoupage pumpkins to match your scheme—easy, custom, and very host-ready.
Color tweaks, ribbon details, and unexpected elements
Add one surprising object—a single artichoke, fig, or a glossy pear—for personality and texture. For floral focal points, dress the vase neck with ribbon, place candle holders nearby, and scatter mini pumpkins, apples, or berries around the base.
Easy transitions for a beautiful fall tablescape
Try these simple moves:
- Start early with greens and lighter tones; deepen hues as the season progresses.
- Tie a slim ribbon around a pumpkin or vase for an immediate, cohesive detail.
- Swap fruit—apples to pears—or add richer tapers and a darker runner for evening warmth.
- Refresh weekly with one small change: new berries, a different candle, or one branch.
- As Thanksgiving nears, increase candlelight and add wheat, pinecones, or darker woods for depth.
“A single tiny change keeps a display feeling fresh and intentionally edited.” — from my client work
Store off-season bits in a labeled box so swaps take minutes. These thoughtful details keep your seasonal decor feeling curated from early season through the holiday.
Fall Table Centerpiece: Budget-Friendly Tips and DIY Ideas
I recommend assembling a compact set of go-to pieces that make styling quick and effortless. A small kit saves time and money. It also makes your home feel pulled together without fuss.
Start by shopping your home. Pull trays, bowls, books, and lanterns to form versatile bases. Mix real clippings with quality faux stems so arrangements last longer and still feel fresh.
- Use pinecones as free filler — they stabilize and add texture.
- Thrift baskets, brass candlesticks, and unique vessels for character.
- Keep floral wire and clear tape handy to secure stems, berries, and small branches.
- DIY small upgrades: spray-paint pumpkins, decoupage a napkin on a gourd, or wrap candles with twine.
Invest in a few core items — a dough bowl, pedestal bowl, glass hurricanes, and a pair of candlesticks. These items work year-round and make every arrangement look intentional.
“With a tiny toolkit and a few smart swaps, you’ll create polished decor on any budget.”
For more hands-on diy fall ideas, try reusing what you already own and curating a tight palette so simple materials read elevated and cohesive.
| Item | Role | Why it helps |
|---|---|---|
| Dough bowl / pedestal | Base and weight | Frames the arrangement and keeps items contained |
| Glass hurricanes | Protect flame | Keeps candles safe near greenery and adds glow |
| Faux stems | Longevity | Reusable and cost-effective for repeated looks |
| Pinecones / natural bits | Filler & stabilizer | Free or cheap, adds texture and anchors pieces |
Conclusion
When guests gather, a single well-scaled display makes the room feel intentionally warm. I mean a low, conversation-friendly arrangement that respects the one-third size rule. Keep it simple, then rest and enjoy the meal.
I recommend starting with a clear focal point, layer texture, and use small swaps to touch autumn as the weeks change. A tight color story ties the spread to the rest of your decor and keeps things calm and curated.
Build a tiny kit of vessels and botanicals so you can refresh in minutes—ribbon, painted pumpkins, or an unexpected pumpkin or fruit make big impact. A single well-proportioned centerpiece or table centerpiece does more than decorate; it invites people in.
I hope this post inspires you to style a display that looks beautiful and feels like home. Keep what you love, edit the rest, and gather often.